Hello Everyone!

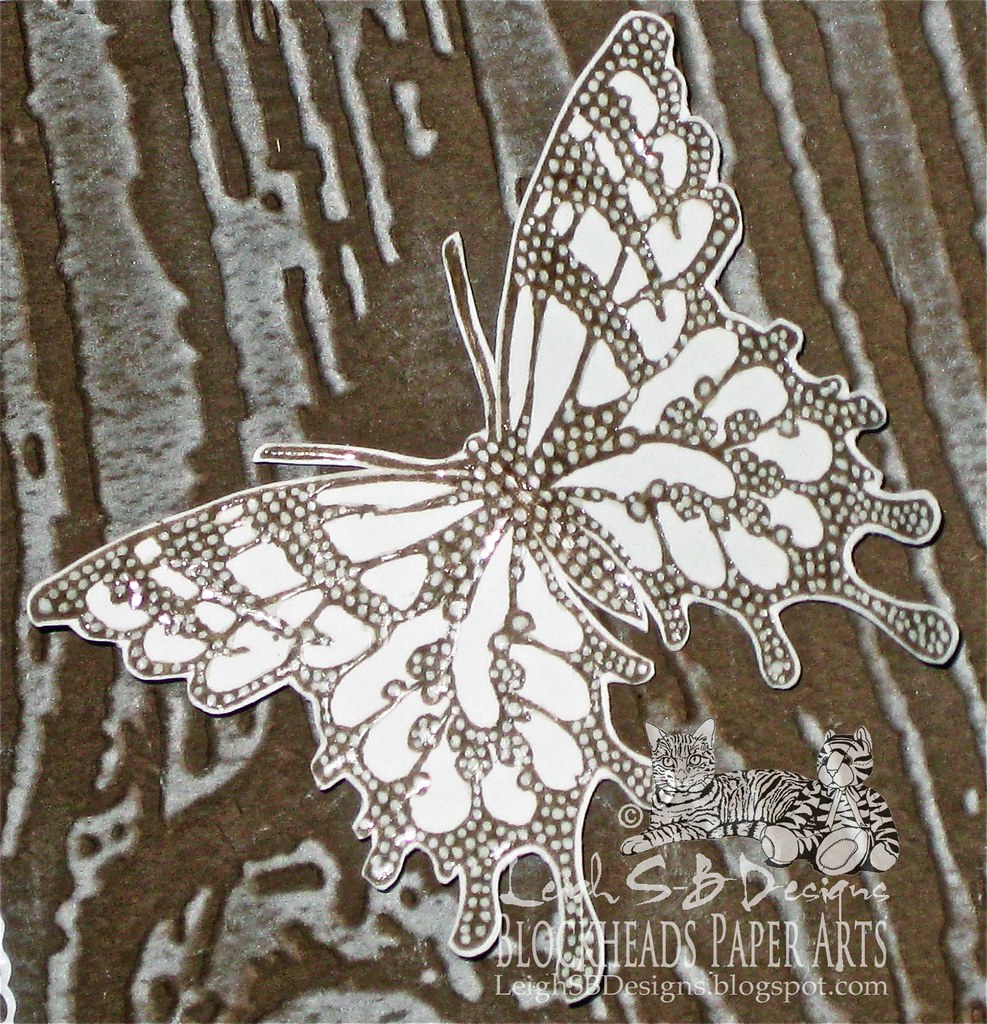
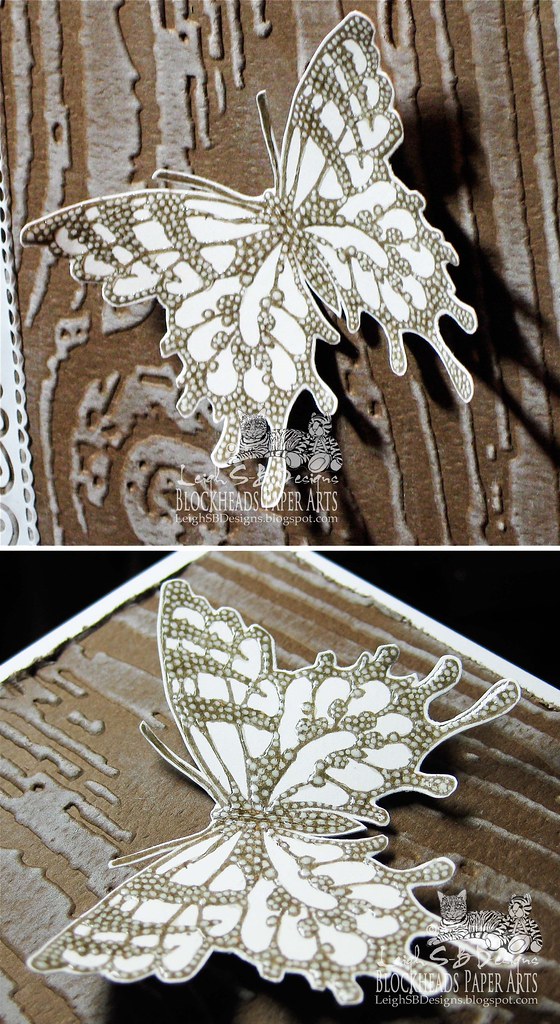
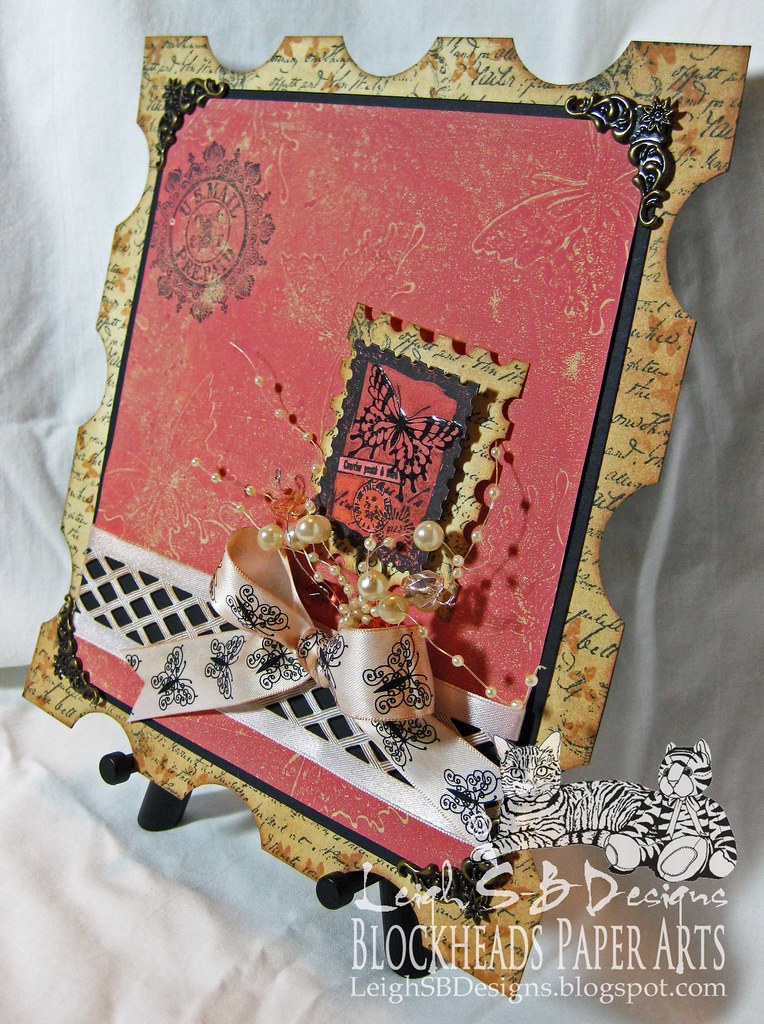
The Blockheads design team are featuring Butterfly projects this month and here's another one of my creations. I had a ball playing with my new 8 x 10 Gelli Arts Printing Plate and created the print below by using up some old acrylic paints destined for the trash and Blockheads Paper Arts large Butterfly stamp from their exclusive Painted Butterflies stamp set.

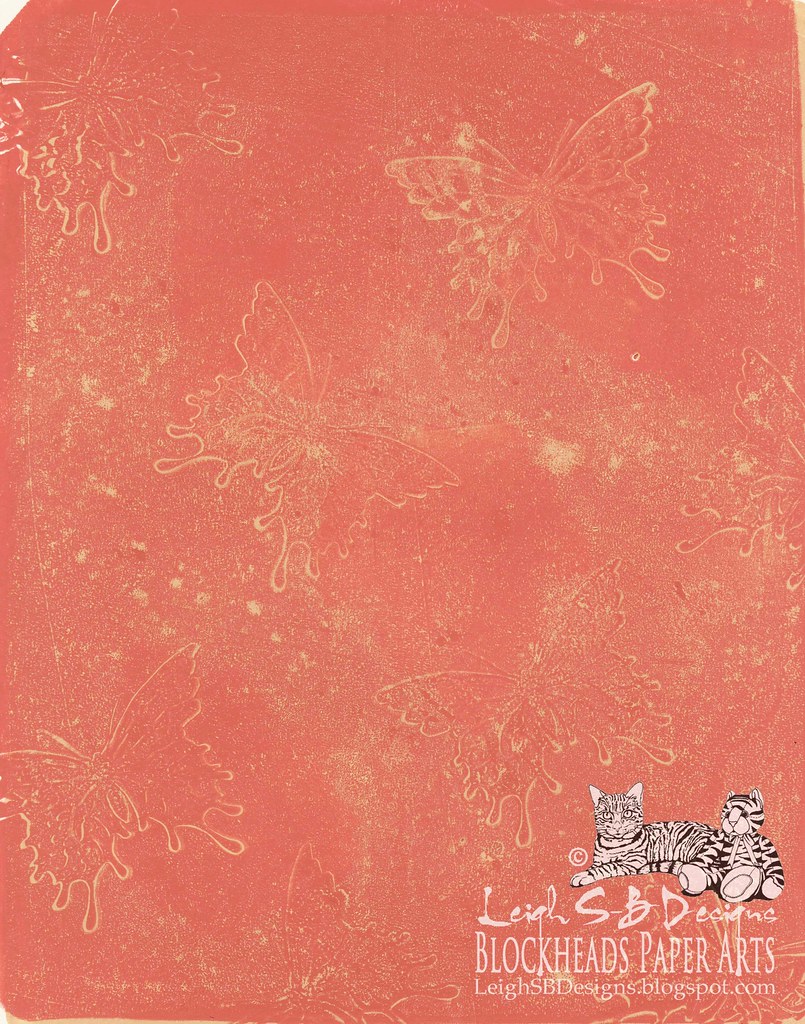
I recently completed a commissioned painting and had put aside some acrylic paints to throw out that were nearly empty or too old to use. But I really hate wasting so I revitalized what was left with some Delta Ceramcoat Gel Blending Medium and first applied a coat of Americana Toffee to the Gelli plate with a brayer, you can use either the Speedball brayer or the Inkssentials Inky Roller. Then placed a sheet of 8 1/2 x 11 inch white cardstock on top and made a print. Next I brayered on a coat of Americana Gooseberry Pink which is more of a peach colour and randomly stamped the Butterfly image all over the plate, blotting away the paint from the stamp with a piece of paper towel between stampings. The rubber stamp removed the paint each time and created the beautiful design when I over-laid the same sheet of cardstock on to the plate and made my final print. Monoprinting really is sooo much fun and Blockheads currently has the 6 x 6 plate in stock ;0)
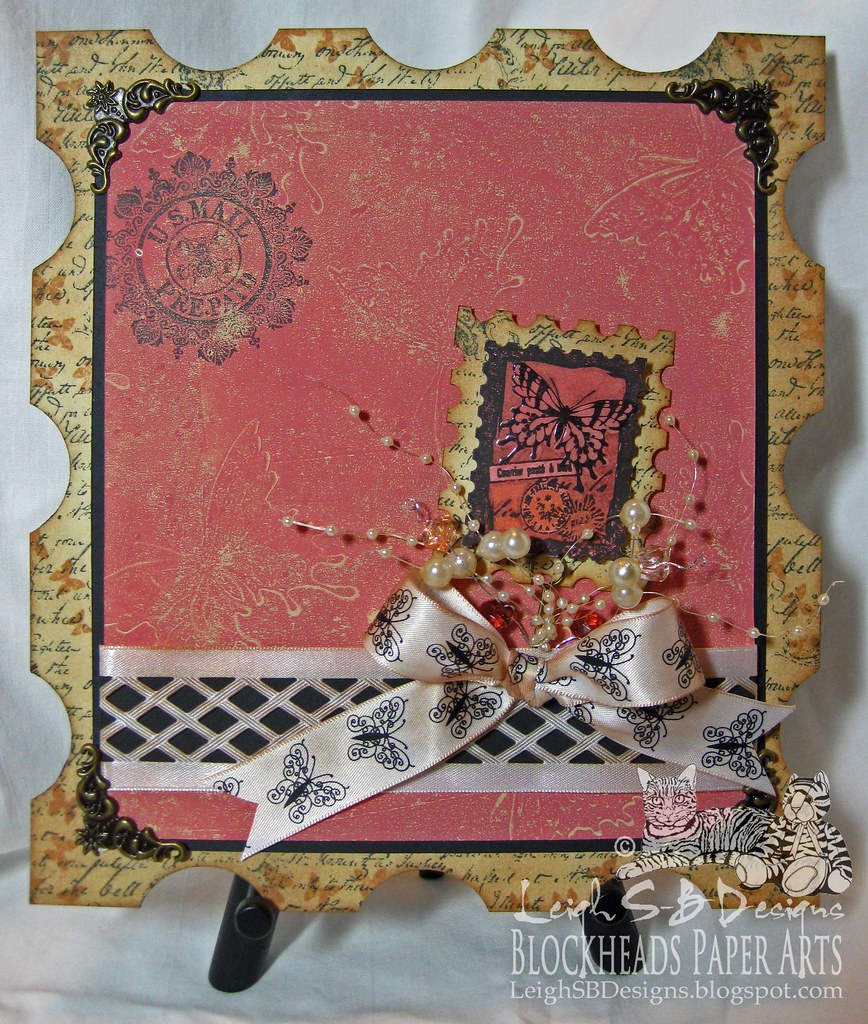
I also recently introduced you to the awesome Perfect Layers tools by Perfect Paper Crafting. I used another one of their fabulous tools on this card called Perfect Squares. This one really is perfect for trimming stamped images without fear of cutting any crooked edges especially if you're like me and like to use off cuts from a stash of scrap cardstock! I also used the Perfect Layers tools to create the black mat and the postage stamp mats! Pop on over to my ambassador page for more info! You'll see the list of tools on the left side and you'll also save 5% on your entire order if you use my special coupon code Leigh5%!

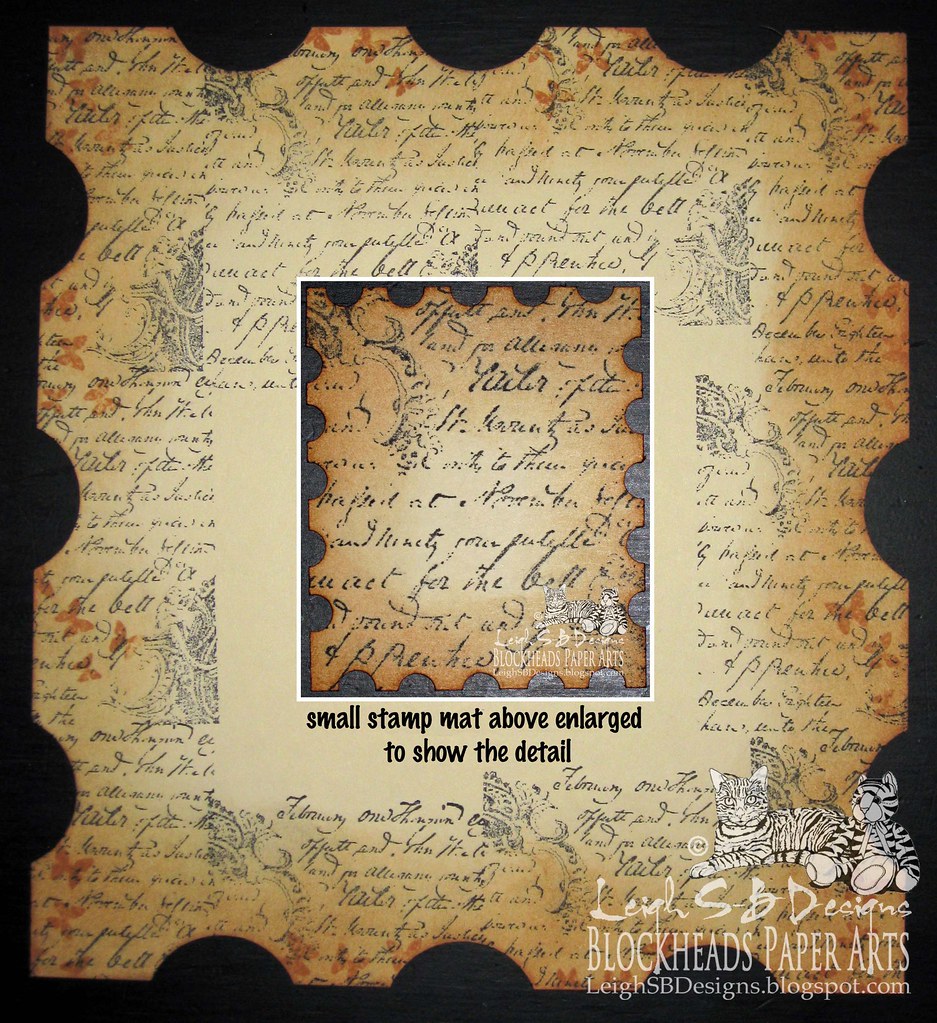
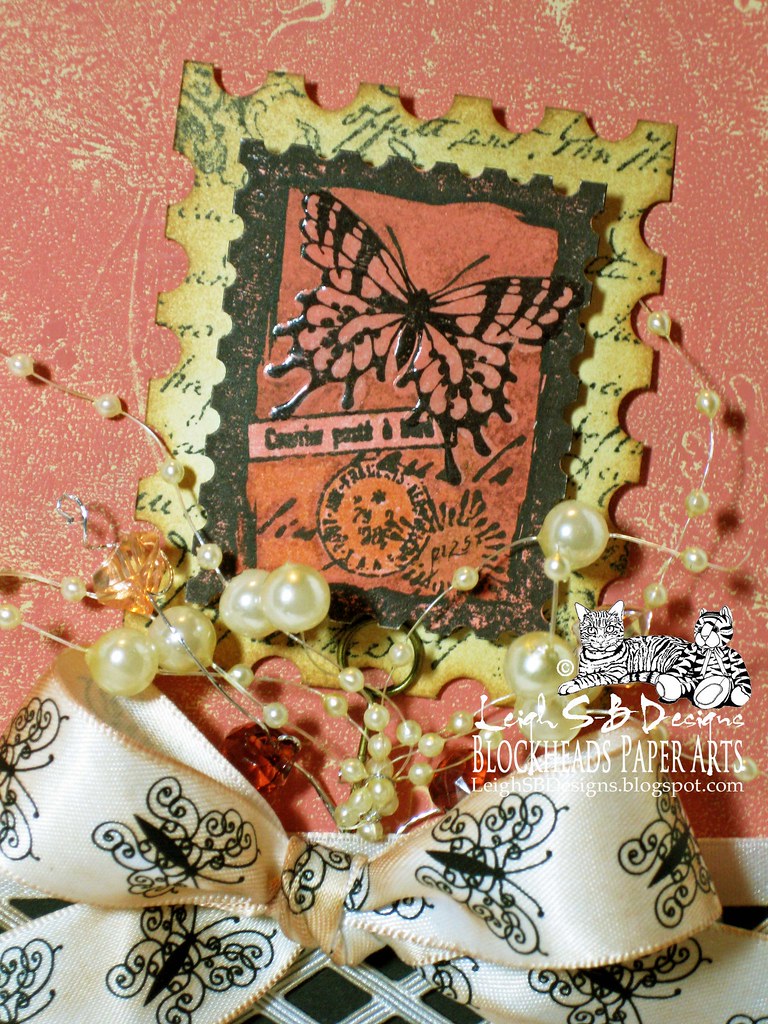
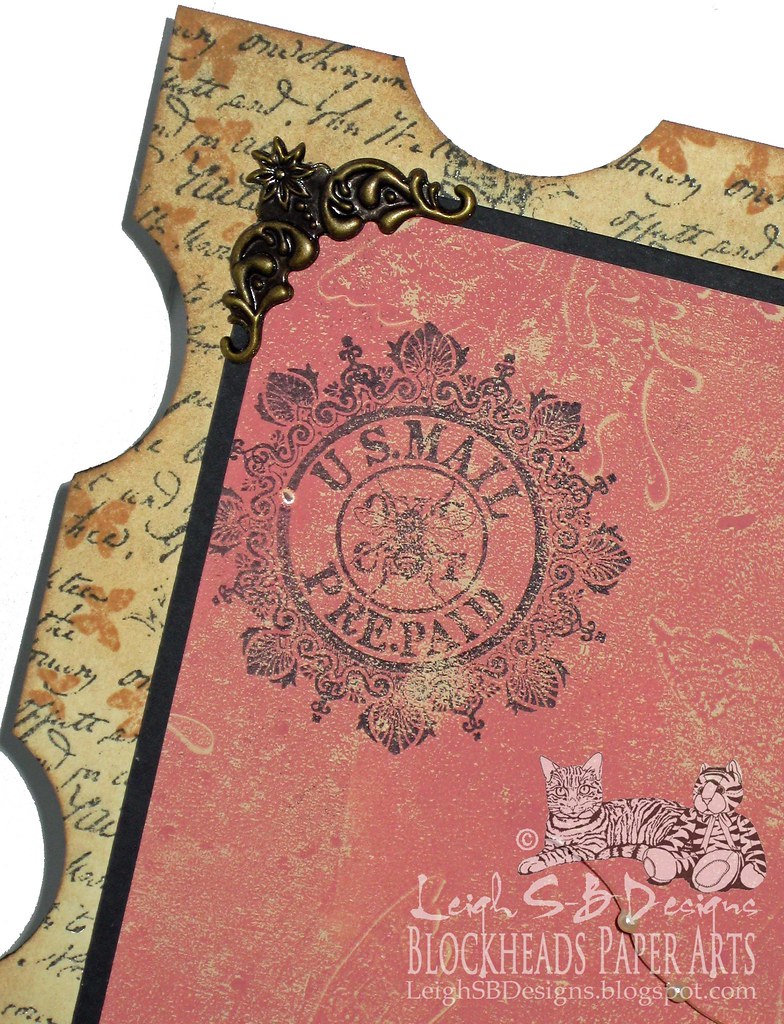
Use the Perfect Layers tool #1 to cut the 1/8" black mat for the butterfly print. Stamp Blockheads' US Mail Prepaid image from their Nature Medallions set onto the print with Black Soot Distress ink in the upper left corner. Lightly stamp onto scrap paper first to remove some of the ink to achieve a more faded impression. Age a length of white lattice ribbon with Tea Dye Distress Ink and adhere it with a piece of black cardstock behind the lattice part to the butterfly print with double sided tape and adhere the print to the black mat with craft glue or tape adhesive. Stamp the Butterfly Postage collage from the Painted Butterflies set with Onyx Black Versafine ink onto another piece of the print and cut out. Use a 1/8" Fiskars hole punch to cut out the notches in the postage stamp border. Colour different areas of the image with Tea Dye, Dried Marigold, Fired Brick and Black Soot Distress Markers. Leave the butterfly the colour of the print background and apply Inkssentials Matte Accents to just the butterfly for a fun effect (scroll down the page for the Ranger products on Blockheads' website).

Cut two mats from cream cardstock to the make the postage stamp mats. The large postage stamp mat measures 8 1/8 x 9 inches and the mini postage stamp mat is 2 1/4 x 2 3/4 inches. Use the #1 Perfect Layers tool to give the large postage stamp mat a 5/8" border when layered with the butterfly print. To make the postage stamp notches I used a 1.5" Marvy Uchida Circle punch. I've put the template I designed up on my Templates page. Stamp the scripty text from Blockheads' ATC Years Ago stamp set with Black Soot Distress Ink all around the edges and stamp the little butterflies from the 123 Backgrounds set with Tea Dye Distress Ink. Stamp the same text onto the small mat and use the #2 Perfect Layers tool to cut a 5/16" border when layered with the stamped Butterfly Postage collage. Apply Tea Dye Distress Ink with an Inkssentials foam ink applicator by Ranger to both postage stamp mats to age and enhance the edges. Adhere both postage stamp mats to black cardstock to make the mats more substantial and cut out with scissors and the hole punches. Adhere the print to the large postage stamp mat with glue.

Adhere the Butterfly Stamp collage to the smaller mat with black pop dots or try the new Kool Tak transparent foam tape! Bend the cardstocks to curve the collage and add one of Tim's antique brass Idea-ology Memo pins to it. Adhere the pin behind the lattice ribbon with a dab of glue and tuck in a sprig of pearls and some coloured glass chips. Make a bow from a length of white butterfly ribbon (Michaels) and age it with Tea Dye Distress Ink. I aged it after making the bow coz I like the variation created by the ink along the folds and edges. Adhere the bow with a glue dot and embellish the card with 4 decorative antique brass photo corners by Scrapbook Basics.
I recently completed a commissioned painting and had put aside some acrylic paints to throw out that were nearly empty or too old to use. But I really hate wasting so I revitalized what was left with some Delta Ceramcoat Gel Blending Medium and first applied a coat of Americana Toffee to the Gelli plate with a brayer, you can use either the Speedball brayer or the Inkssentials Inky Roller. Then placed a sheet of 8 1/2 x 11 inch white cardstock on top and made a print. Next I brayered on a coat of Americana Gooseberry Pink which is more of a peach colour and randomly stamped the Butterfly image all over the plate, blotting away the paint from the stamp with a piece of paper towel between stampings. The rubber stamp removed the paint each time and created the beautiful design when I over-laid the same sheet of cardstock on to the plate and made my final print. Monoprinting really is sooo much fun and Blockheads currently has the 6 x 6 plate in stock ;0)
I also recently introduced you to the awesome Perfect Layers tools by Perfect Paper Crafting. I used another one of their fabulous tools on this card called Perfect Squares. This one really is perfect for trimming stamped images without fear of cutting any crooked edges especially if you're like me and like to use off cuts from a stash of scrap cardstock! I also used the Perfect Layers tools to create the black mat and the postage stamp mats! Pop on over to my ambassador page for more info! You'll see the list of tools on the left side and you'll also save 5% on your entire order if you use my special coupon code Leigh5%!
Use the Perfect Layers tool #1 to cut the 1/8" black mat for the butterfly print. Stamp Blockheads' US Mail Prepaid image from their Nature Medallions set onto the print with Black Soot Distress ink in the upper left corner. Lightly stamp onto scrap paper first to remove some of the ink to achieve a more faded impression. Age a length of white lattice ribbon with Tea Dye Distress Ink and adhere it with a piece of black cardstock behind the lattice part to the butterfly print with double sided tape and adhere the print to the black mat with craft glue or tape adhesive. Stamp the Butterfly Postage collage from the Painted Butterflies set with Onyx Black Versafine ink onto another piece of the print and cut out. Use a 1/8" Fiskars hole punch to cut out the notches in the postage stamp border. Colour different areas of the image with Tea Dye, Dried Marigold, Fired Brick and Black Soot Distress Markers. Leave the butterfly the colour of the print background and apply Inkssentials Matte Accents to just the butterfly for a fun effect (scroll down the page for the Ranger products on Blockheads' website).
Cut two mats from cream cardstock to the make the postage stamp mats. The large postage stamp mat measures 8 1/8 x 9 inches and the mini postage stamp mat is 2 1/4 x 2 3/4 inches. Use the #1 Perfect Layers tool to give the large postage stamp mat a 5/8" border when layered with the butterfly print. To make the postage stamp notches I used a 1.5" Marvy Uchida Circle punch. I've put the template I designed up on my Templates page. Stamp the scripty text from Blockheads' ATC Years Ago stamp set with Black Soot Distress Ink all around the edges and stamp the little butterflies from the 123 Backgrounds set with Tea Dye Distress Ink. Stamp the same text onto the small mat and use the #2 Perfect Layers tool to cut a 5/16" border when layered with the stamped Butterfly Postage collage. Apply Tea Dye Distress Ink with an Inkssentials foam ink applicator by Ranger to both postage stamp mats to age and enhance the edges. Adhere both postage stamp mats to black cardstock to make the mats more substantial and cut out with scissors and the hole punches. Adhere the print to the large postage stamp mat with glue.
Adhere the Butterfly Stamp collage to the smaller mat with black pop dots or try the new Kool Tak transparent foam tape! Bend the cardstocks to curve the collage and add one of Tim's antique brass Idea-ology Memo pins to it. Adhere the pin behind the lattice ribbon with a dab of glue and tuck in a sprig of pearls and some coloured glass chips. Make a bow from a length of white butterfly ribbon (Michaels) and age it with Tea Dye Distress Ink. I aged it after making the bow coz I like the variation created by the ink along the folds and edges. Adhere the bow with a glue dot and embellish the card with 4 decorative antique brass photo corners by Scrapbook Basics.
Simon Says Stamp and Show Challenge asks 'What are we known for'. Well altered dominoes is my forte but when it comes to paper arts I love to create detailed, intricate, dimensional, unusual and beautiful pieces...I think this one fits the bill don't you ;0)
Thanks for visiting with me today!
I've entered my card in the following challenges:
365 Cards #24 - Lovely Liquids
Dilly Beans - Metal Accents
Shopping Our Stash #86 - Use Your Oldest Ribbon
Paper Play Time #2 - Use Some Brown
Simon Says Stamp and Show - What Are You Know For
Simply Create Too #29 - Anything Goes
QKR Stampede #23 - Soft Pastel Colours
Joyful Stamper Inspire Me Fridays #93 - Anything Goes
Through The Craft Room Door Jan 22-28 - Anything Goes
QKR Stampede #23 - Soft Pastel Colours
Joyful Stamper Inspire Me Fridays #93 - Anything Goes
Through The Craft Room Door Jan 22-28 - Anything Goes
Happy Stamping!

THE SHARPIE DOMINO QUEEN