Welcome to Velvet Paw Creations - Design Team Projects by Leigh Snaith-Brunton - The Sharpie Domino Queen & owner of LeighSBDesigns Art Stamps!

Thursday, February 28, 2013

Textured Pearls Domino Necklaces - A DominoART Technique!

Hello Friends!


Before I tell you all about today's projects I want to remind everyone that DominoART's first official challenge, sponsored by Rick St Dennis, starts March 1st over on my DominoART Blog!  Rick is graciously providing a freebie digi Domino Book Kit which will only be available for download for two days as well as some awesome prizes!  So pop by for the grand launch Friday March 1st!  It's going to be so much fun :0)

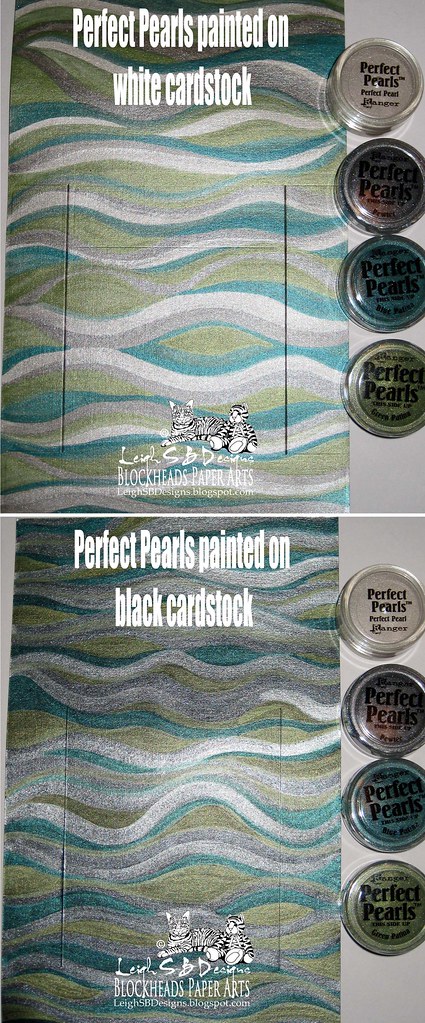
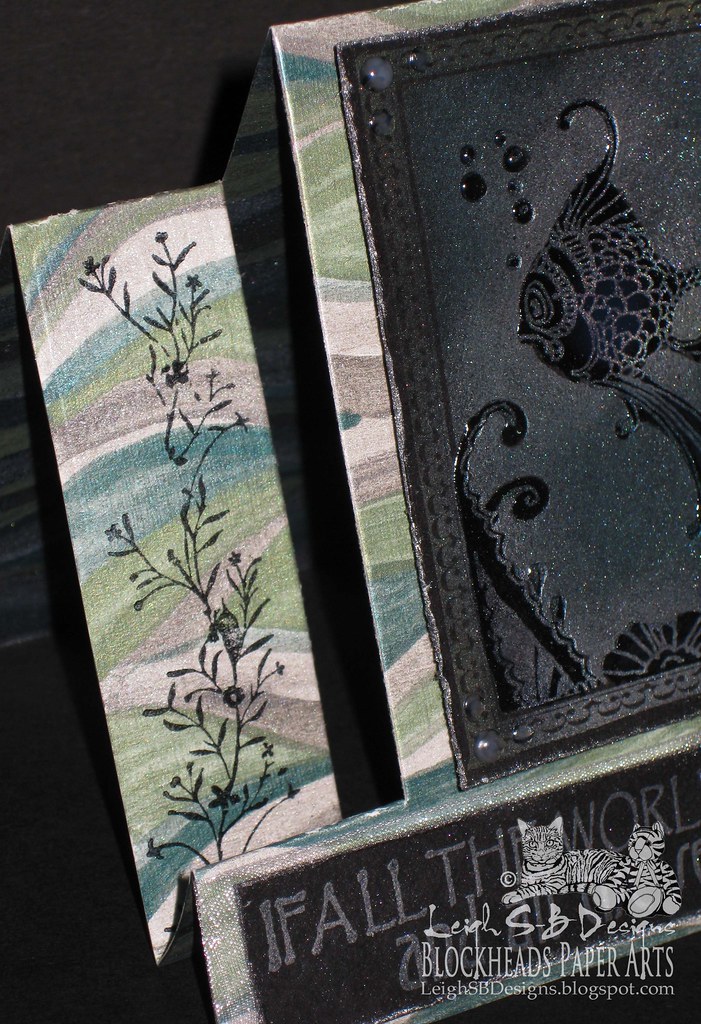
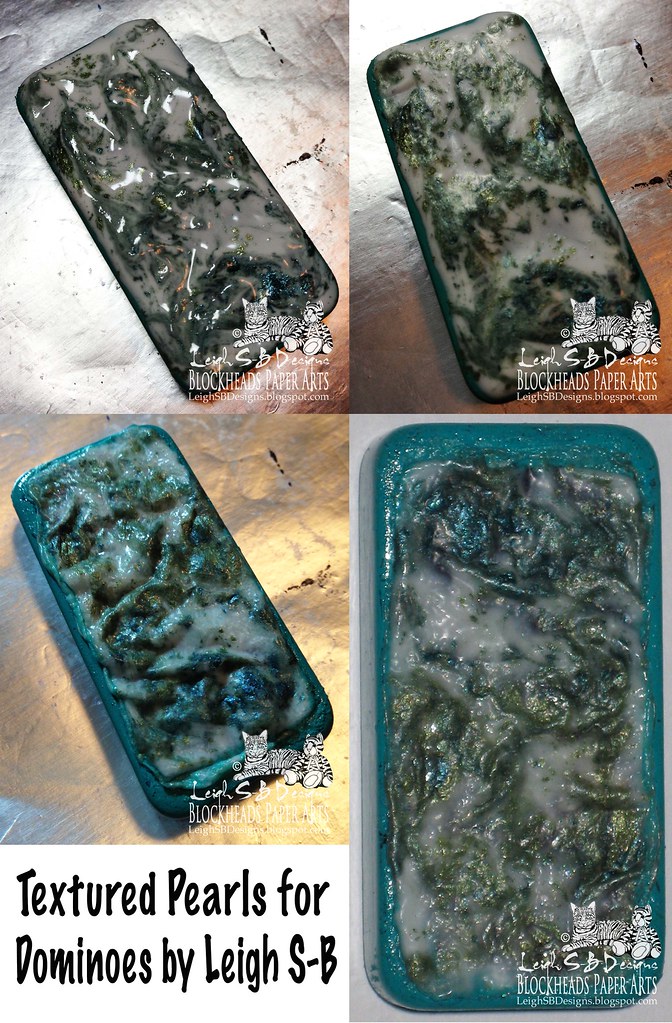
To get you in the mood for altering dominoes I've got a super fun technique for you all to try that I first discovered in 2002 and it's still a pleasure to do!  The Blockheads Design Team have been featuring Perfect Pearls this month.  For paper arts this one is known as Heated Pearls but for dominoes I decided to call it Textured Pearls and you can see in my demo photos why I decided on that name.  The finished look is sooo textural and shimmery!

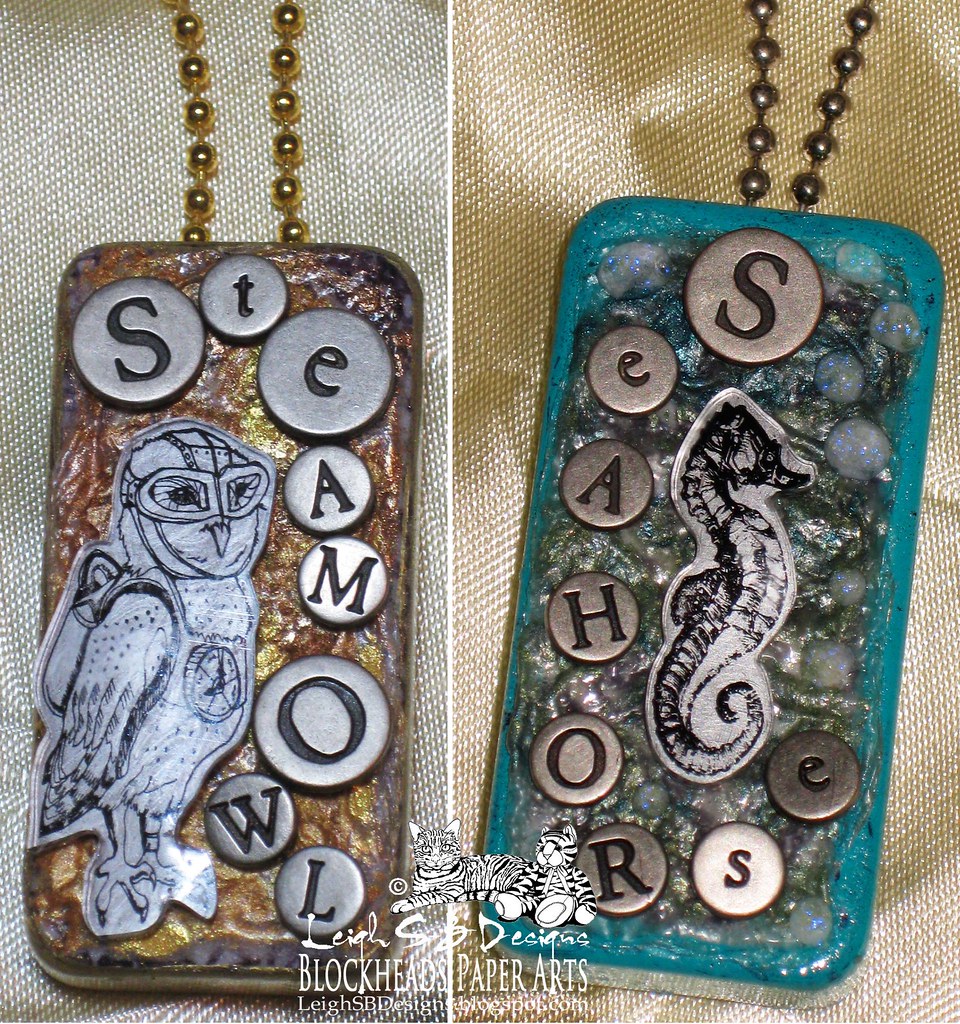
For the blue domino I used Perfect Pearls Patina Blue and Green and Perfect Pearl (white) with a small dollop of glue.
 Heated Pearls is a fun paper arts technique that translates easily to dominoes!  It is also the perfect technique to try on your stash of dominoes that got messed up in some way or other!  I recycled some white dominoes and used assorted Perfect Pearls and Pearl Ex powders to create my demo pieces.

On all three of my dominoes I started off by colouring the sides with paint pens to hide any messes and to match the Perfect Pearls colour scheme.  Now for the fun part...apply a generous amount of white craft glue to the surface of the domino with a toothpick or your finger and spread it around making sure to cover up anything you want to hide.

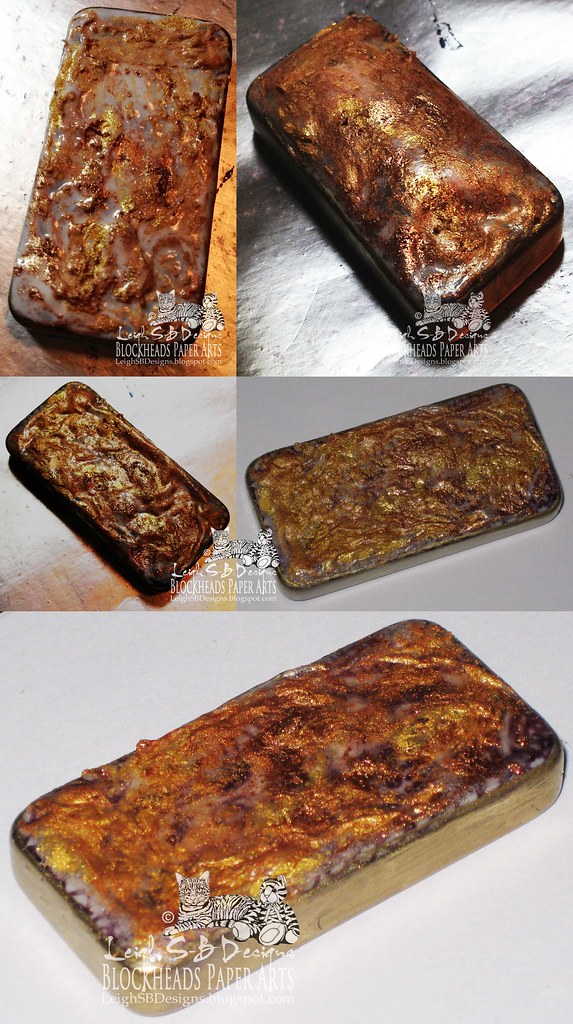
For the gold domino I used Perfect Pearls Perfect Gold and Perfect Copper with a semi-generous dollop of glue.
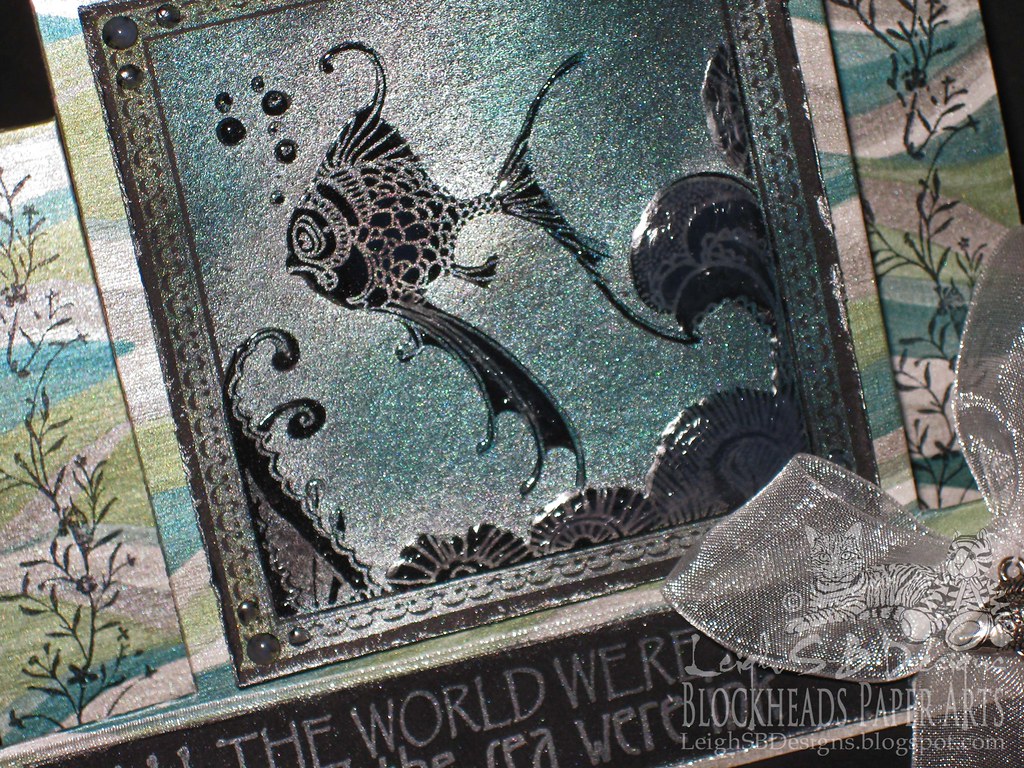
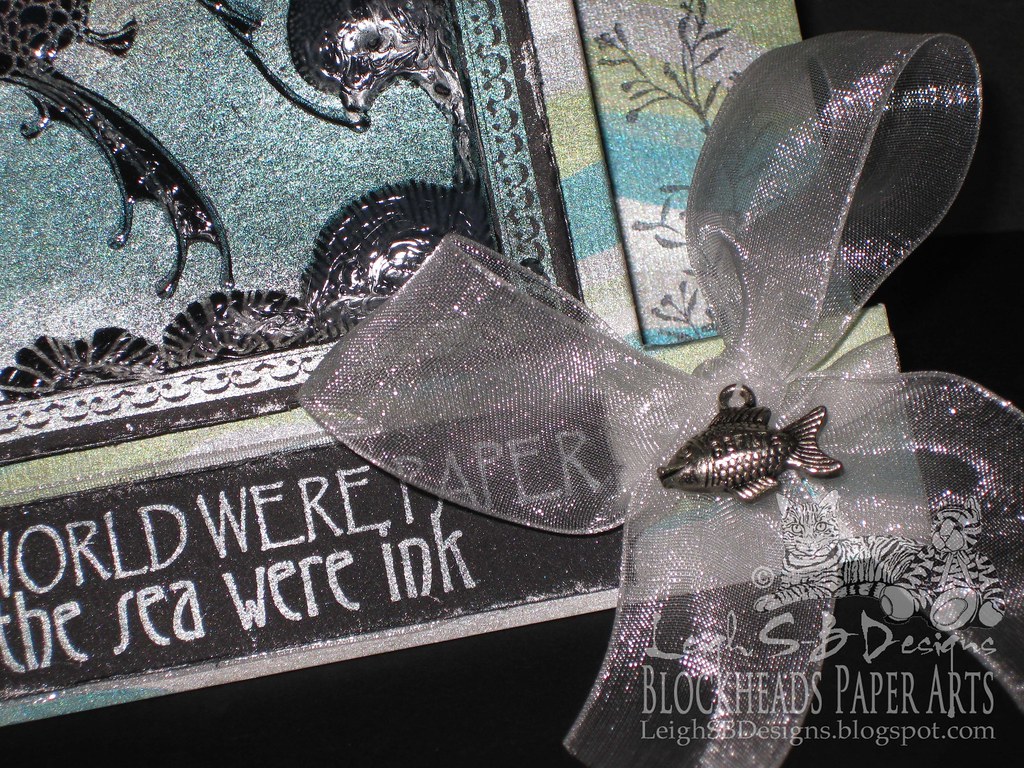
Sprinkle Perfect Pearls or Pearl Ex powder randomly onto the glue.  You can have fun experimenting with different colour combinations and the amount of glue and powder you use.  Mix the powder into the glue with a brush or your finger and apply a lot of heat to the glue mix with a heat gun.  As the glue heats up it will bubble and ooze and you can stop applying the heat once all the powder has melted into the glue and you're happy with the result.  Let everything cool down for a few minutes coz the domino and the glue do get quite hot then you can dab the surface and squish the glue down in places if you need to and then put aside to allow it to completely cool and harden.  The result is this wonderful crumpled up looking surface that's so textural and pretty.

To complete the first two DominoART necklaces I used the following supplies:
Exclusive Blockheads Paper Arts stamps: the Steampunk Owl from Fringe Folktails and the Seahorse from Seashells with Round Sand Frame
 Inkssentials shrink plastic
Jet Black StazOn ink
Making Memories Metal Alphabet Charms
Judikins Diamond Glaze
Metallic Silver Paint Pen
Stickles glitter glue
Pin-Bail combo
E6000 Adhesive
Silver and Gold tone ball chains
 
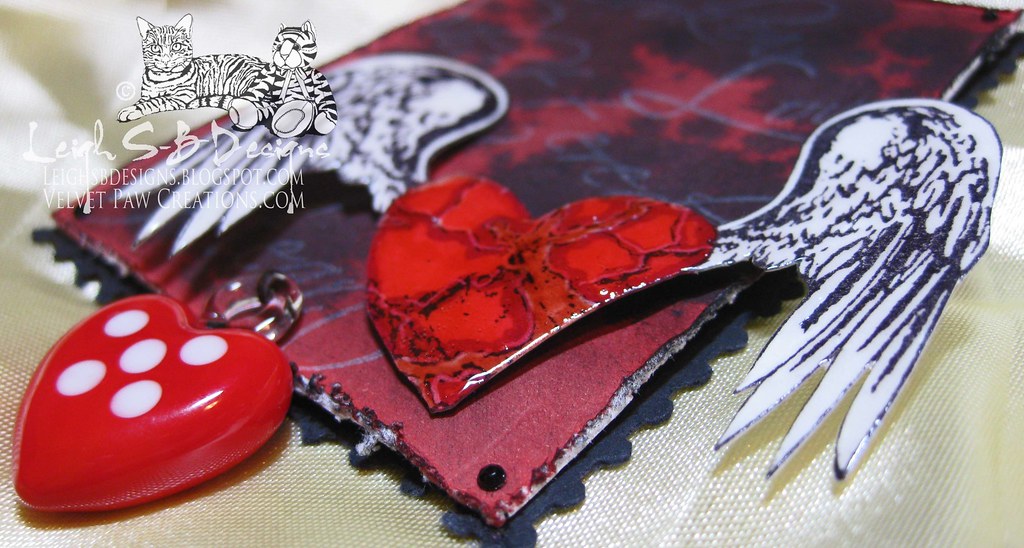
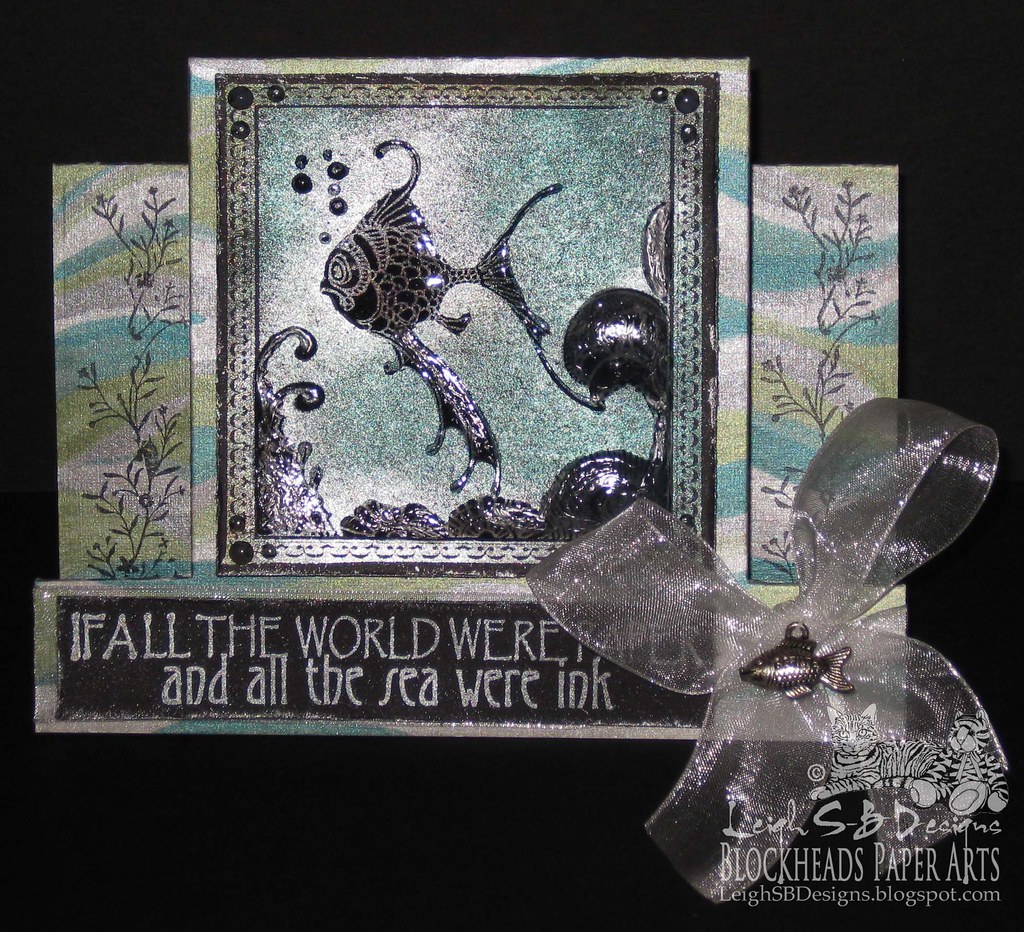
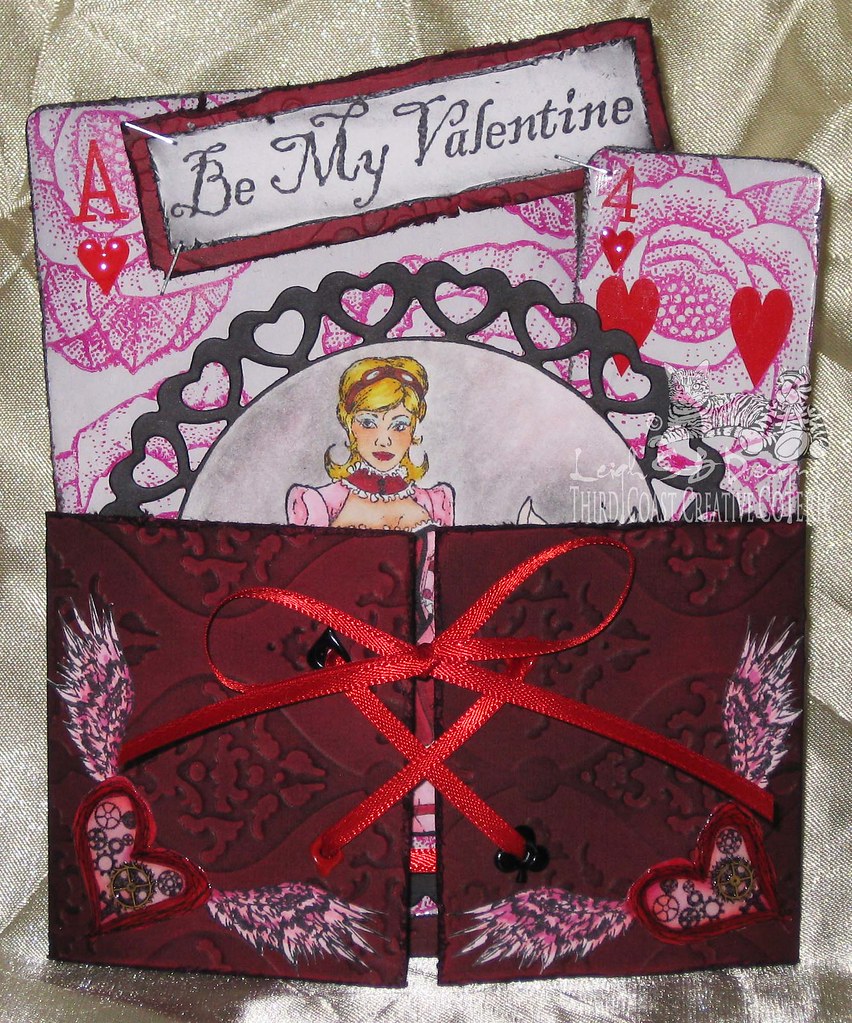
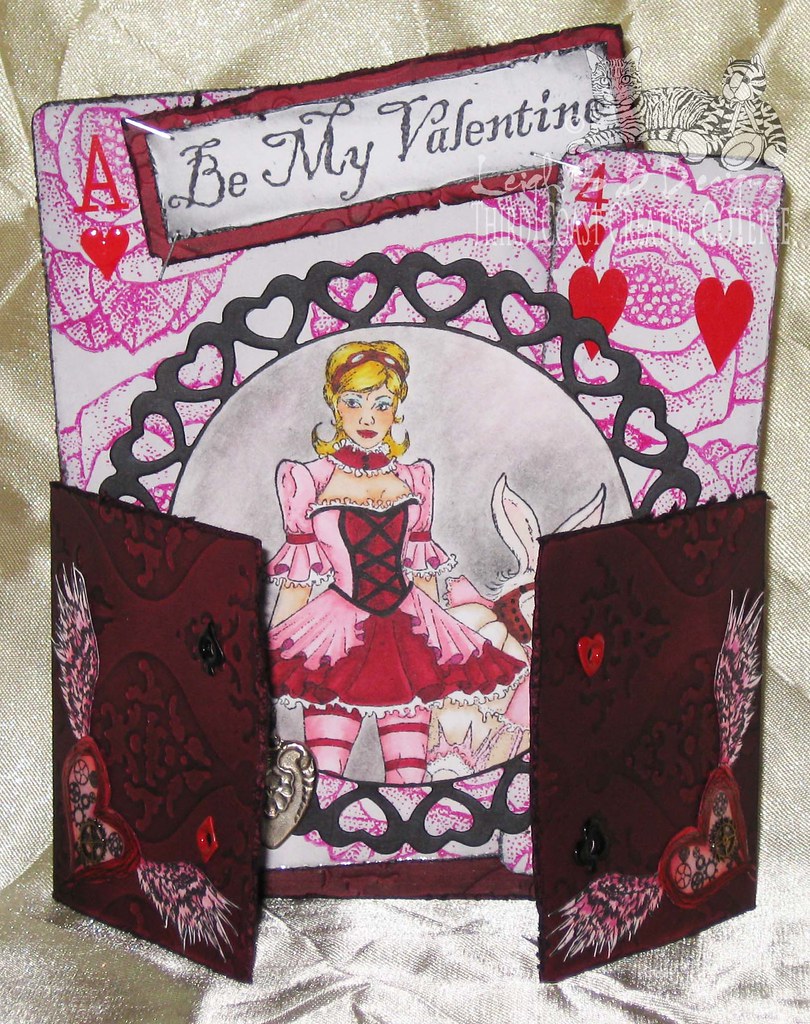
This next necklace I made for Day 5 of my Romancing the DominoART event.  Pop over for more photos and info on the products I used.


Thanks for visiting and I look forward to seeing you all taking part in my DominoART Blog's first challenge!  Have a fabulous weekend :0)

Happy Stamping!
 THE SHARPIE DOMINO QUEEN
I design for Blockheads Paper Arts * Third Coast Rubber Stamps * Lost Coast Designs * About Art Accents

DominoART Challenges launch March 1st with a Rick St Dennis Bang!

Hello Friends! Don't forget that I'm launching DominoART Blog Challenges on Friday March 1st!  Challenge #1 is sponsored by Rick St Dennis Digital Stamps!  Rick is providing a freebie digi Domino Book Kit and sponsoring the prize! 


To launch our Challenges on Friday March 1st, Rick will be providing a freebie digi Domino Book Kit that will be up on the DominoART Blog for 2 days only!  DominoART readers will get to download it and use it for their challenge entries!  So keep a close eye on DominoART for the digi to become available! 

But wait there's more...for the April Challenge Rick is also creating a very special Alice in Wonderland digi especially for us!  WOW, how awesome is that!  DominoART readers will get a special discount code to use in Rick's store!  So bookmark the DominoART Blog coz you don't want to miss a thing ;0) 

Happy Stamping!
 THE SHARPIE DOMINO QUEEN
I design for Blockheads Paper Arts * Third Coast Rubber Stamps * Lost Coast Designs * About Art Accents

Monday, February 25, 2013

Rocking Cheshire Cat Card - Smeared Ink GDT!

Hello Friends!

Today I'm sharing a kinetic card featuring Smeared Ink's digi image, the Cheshire Cat!  Such a fun and totally bizarre image to create with, I love it :0).   I made the card as my GDT sample for their Smudgy Antics challenge, Crumple It, which starts today.


Print the image onto Neenah Solar White cardstock and colour using Disney's colour scheme with the following Copics: RV10, 13, 17, C0, 3, W3, Y13, R46, YG06, BV01, 02, 04, E000, 01, 02, 13, 15, 17, 18 and the 0 colourless blender.  Cut out the image and adhere it to a sheet of dark red cardstock and cut out leaving a narrow border.


Crumple up a square piece of white cardstock and apply Shaded Lilac and Spun Sugar Distress Inks with a foam ink applicator tool.   Apply Black Soot DI to the edges.  Make a square folded card from the same dark red cardstock and adhere the crumpled mat to it with glue and add yellow brads to all 4 corners.  Embellish the brads with sparkly pink heart jewel stickers by Stampendous. 


Adhere the Cheshire Cat to the card with a mini card spring by Papermania Docrafts.  The spring action really adds to the bizarreness of the image when it spins and wobbles!  I'm having some computer tech issues at the moment so I'm hoping to add a little video clip of it in action soon.

Thanks for visiting with me today :0)

Happy Stamping!
 THE SHARPIE DOMINO QUEEN
I design for Blockheads Paper Arts * Third Coast Rubber Stamps * Lost Coast Designs * About Art Accents

Thursday, February 21, 2013

Turn Scraps into Vintage Elegant TagART

Hello Friends!
Today I'm sharing a tall tag I made just using scraps!


I'm a self-confessed hoarder when it comes to my art.  I can't throw anything out because everything 'speaks' to me and I see its potential for future use!  Nothing is safe whether it be wine corks, gum containers, ribbon off gift boxes but especially scraps of cardstock left over from previous projects.  I know I'm not alone in this affliction, raise your hand if you hoard your scraps too, you know who you are ;0)

In an effort not to hoard the left over scraps from a Gelli Arts Plate print I created for my over-sized postage stamp card, Painted Butterflies, I used them to make this tall tag!  I'm so proud of myself LOL!

 The scraps are from the edges of the butterfly print I made and you can see the paint layers I used which I thought looked rather cool.   All the scraps were stitched down with white thread onto a larger piece of speckled brown cardstock and then adhered to this large ticket I kept from the November Original Stamp convention last year.
 
I like the way the black ticket lines frame the scraps panel.  Everything was adhered to a larger scrap piece of peach cardstock and I used my Perfect Layers #1 tool to cut the 1/8 inch border.  The 3/16" tag hole was punched with a Crop-A-Dile and the white flower eyelet attached and embellished with various fibers and ribbons...also scraps ;0)


The vintage portrait cameo from Blockheads Vintage Portrait stamp set, which was stamped on another colour coordinated Gelli Arts print scrap, and the word Dream from the Verses stamp set were both stamped with Midnight Black VersaMagic Ink.  I found it best to heat set the ink coz it stayed wet longer on the painted surface.  I fussy cut out the cameo leaving a narrow peach border and adhered it to another scrap piece of cream cardstock and cut it out again leaving a narrow cream border.  The cameo was adhered to the tag with craft glue and embellished with paper flowers and a sheer white bow.

Thanks for visiting with me today!  I hope I've inspired you to get out your scraps and actually use them ;0)
Happy Stamping!
 THE SHARPIE DOMINO QUEEN
I design for Blockheads Paper Arts * Third Coast Rubber Stamps * Lost Coast Designs * About Art Accents

Wednesday, February 20, 2013

"Masquerade Ball" DominoART Necklace

Hello Friends!
How about a sneak peek at the next challenge theme on the Third Coast Creative Challenges Blog!
The Mardi Gras - Masquerade Challenge starts this Friday Feb 22 and everyone is invited to the party!
 
  Today is my turn to post on the Third Coast Coterie Blog and here's my DominoART Necklace for your inspiration featuring my signature "Sharpie Domino Queen" technique ;0)


This enchanting mystery lady is Masquerade VB-098-L by Third Coast Rubber Stamps.
I stamped her on the Bendomino game piece with Jet Black StazOn ink and heat set before colouring her with the following Sharpies:  Almond, Brown, Marigold, Olive, Kiwi, Purple and Lilac.  The metallic details were added with a gold paint pen and then the entire piece was sealed with a coat of Judikins Diamond Glaze.  I adhered a brass bail on the back with E6000 adhesive and added the gold beads and ball necklace to fit the Mardi Gras theme.
 

Happy Stamping!
 THE SHARPIE DOMINO QUEEN
DominoART Blog
Velvet Paw Creations

I design for Blockheads Paper Arts * Third Coast Rubber Stamps * Lost Coast Designs * About Art Accents

Wednesday, February 13, 2013

S&S Bloody Valentine Book and Page Three "Burning Angel"

Hello Friends!

Welcome to Day 3 and the finale of the Smeared and Smudged "Bloody Valentine" Blog Hop!  Here's Page 3 plus a look at my finished book featuring stamps from Smeared Ink.  The inspiration for today's page is another Depeche Mode song titled "In Your Room".


Continuing on from yesterday's post...this ATC started out white but this time I only dabbed Fired Brick Distress Stain onto a craft sheet and pressed the ATC into it to get the bright blood splattered effect.  The image from Smeared Ink's "As Death" rubber set was stamped with Onyx Black Versafine ink and the skeletal angel was coloured with Dried Marigold Distress Marker before I applied Inkssentials Matte Accents to make him stand out.  The text was handwritten with a white gel pen.  I stamped the word 'Angel" in White Cloud VersaMagic ink around the edges of the smaller black mat.  Two Winged Hearts from Smeared Ink's Heart Wings rubber set were coloured and coated the same as the others and adhered to the page and to the back cover with a dab of Silicone dimensional glue.

 
All of the red mats and the black one on the book cover were stamped with Smeared Ink's flock of flying hearts stamp.  The backing for all the pages and the book covers were all embossed with Craftwell's 8.5 x 11" Regency embossing folder which I ran through my eBosser machine (available at Crafter's Companion).  All were distressed with Tim's Paper Distresser tool and the red ones treated with Black Soot Distress Ink.  I embellished the front and back covers with Inkssentials Black Enamel Accents and made the book title on my Dymo Buddy Label Maker. 

Here's a closer look at my finished book :0)
 

Thanks for visiting and leaving all your wonderful comments!  I hope you enjoyed seeing my dark and twisty projects ;0)  You've still got a few more blogs to visit so off you go, the Blog Roll is there on the right!

Don't forget that my DominoART Blog's Romancing the DominoART event starts Feb 14th!  I'm accepting new players throughout the event so email me your altered game piece art!  Click the banner below to check out all the details and show us your romantic side DominoART style and join the fun!


Now for a challenge or two...
Hiding in my Craft Room #84 - Super Scraps Saturday
(I used scraps for everything except the large mats)

Happy Stamping!
 THE SHARPIE DOMINO QUEEN
I design for Blockheads Paper Arts * Third Coast Rubber Stamps * Lost Coast Designs * About Art Accents

Tuesday, February 12, 2013

S&S Bloody Valentine Book - Page Two "Obsession"

Hello Friends!
Welcome to Day 2 of the Smeared and Smudged "Bloody Valentine" Blog Hop!  Here's Page 2 of my 3 page book featuring stamps from Smeared Ink.  The inspiration for today's page is the poem "The Bride of Corinth" by Goethe 1797.  FYI, I managed to get better photos of yesterday's Page 1 if you'd like to go back for another look see ;0)


I pretty much used all the same supplies I listed yesterday for Page 1 so now I'd like to tell you a bit about how I made them.  All the pages started out with an ATC sized piece of white cardstock but then I treated each one slightly differently.  The Page 1 ATC was done in the same way I described for the "Beating Hearts" ATC cover I shared on Sunday but today's ATC didn't get the blood splats added.  The image from Smeared Ink's "As Death" rubber set was stamped with Onyx Black Versafine ink and the devil girl was treated with a coat of Fired Brick Distress Marker before applying Inkssentials Matte Accents to make her stand out.  The text was handwritten with a white gel pen.  I used my Perfect Layers tools to cut all the black and red mats.  I stamped the word 'Obsession" in White Cloud VersaMagic ink along the bottom edge of the ATC and around the edges of the smaller black mat.  The edges of all the ATCs were then treated with Black Soot Distress Ink.  I stamped the Winged Heart from Smeared Ink's  Heart Wings rubber set with Tuxedo Black Memento Ink onto a scrap piece of Neenah Solar White cardstock and coloured it with Copics R39, R46 and Fired Brick Distress Marker.  I fussy cut out the image and coated the entire piece with Judikins Diamond Glaze then adhered it to the page with a dab of Silicone dimensional glue.


Thanks for visiting and leaving all your wonderful comments!  See you tomorrow for Page 3 and the finished book ;0)  Now continue on your creepy hop if you dare! 
Blog Roll is there on the right!


Now for a challenge or two...
Sparkle and Glitter with Rick - #9 Hugs and Kisses
Simon Says Stamps - Have a Heart
Creepie Cute - My Creepy Valentine


Happy Stamping!
 THE SHARPIE DOMINO QUEEN
I design for Blockheads Paper Arts * Third Coast Rubber Stamps * Lost Coast Designs * About Art Accents

Monday, February 11, 2013

S&S Bloody Valentine Book - Page One "Broken Love Shattered Heart"

Hello Friends!
It's time to romance your dark side!  I'm participating in the Smeared and Smudged "Bloody Valentine" Blog Hop!  Here's page 1 of my 3 page book featuring stamps from Smeared Ink's Heart Wings rubber stamp set.  I was inspired by the lyrics from Depeche Mode's song "Lie To Me". Check out yesterday's post if you missed seeing my ATC that's going on the cover of this book :0)

I managed to get better photos today which I've added here at the top of the post!


All supplies unless stated otherwise are available at Blockheads Paper Arts:
ATC white cardstock
Red and Black cardstock
Copic Markers: R39 and 46
Fired Brick Distress Marker
Fired Brick and Black Soot Distress Stains
Onyx Black Versafine ink 
Black Soot Distress Ink
Inkssentials Foam ink applicator
Tim's Paper Distresser Tool
 White gel pen 
Judikins Diamond Glaze
 Perfect Layers tools - Perfect Paper Crafting
Black faceted self-adhesive gems - Michaels
Watch part (gear) - SkyBluePink
Black sheer organza ribbon - Michaels
Silicone Glue - Create and Craft UK
Craft Glue


Thanks for visiting...now continue on your creepy journey into the macabre if you dare! 


Blog Roll


Now for a challenge or two...
Simon Says Stamps - Have a Heart
Creepie Cute - My Creepy Valentine


Happy Stamping!
 THE SHARPIE DOMINO QUEEN
I design for Blockheads Paper Arts * Third Coast Rubber Stamps * Lost Coast Designs * About Art Accents

Sunday, February 10, 2013

"Beating Hearts" ATC Challenge with Smudgy Antics!

Hello Friends!
As the Spotlight Guest Designer for February over at the Smeared and Smudged Forum I also get to create for their Smudgy Antics Challenges :0)  Starting tomorrow its an ATC challenged called Beating Hearts and here's mine featuring stamps from Smeared Ink's Heart Wings set for your inspiration!  FYI, Smeared Ink now has a Rubber Club so pop over and join to get your hands on some of their classic digi images made into rubber as well as completely new images that will never be added to their digi line!


I base coloured a white ATC card with Fired Brick Distress Stain.  Then puddled some Black Soot Distress Stain onto a craft sheet and pressed the ATC down onto it to create the dark blood splats.  Then stamped the words in White Cloud VersaMagic ink.  I tattered the edges of the ATC with Tim's Paper Distresser Tool and applied Black Soot Distress Ink to the whole ATC with a foam ink applicator.  I stamped the broken heart image with Tuxedo Black Memento Ink onto a scrap piece of Neenah Solar White cardstock and coloured it with the following markers:  Copics R39, R46 and Fired Brick Distress Marker and added crack lines with a white gel pen.  I fussy cut out the image and coated the entire piece with Judikins Diamond Glaze.  I attached a glass heart to the ATC with black thread then adhered the ATC to a scrap piece of black cardstock with dimensional glue dots and used my Perfect Layers #2 tool to cut the 1/8" border.   Then used a blunt pair of Kraft Edgers scissors to cut a ragged 'picket fence' border that I decided looks more like grave stones but ended up looking more like a postage stamp border...damn!  I completed the ATC by adhering the broken heart with a dab of silicone glue to give it even more dimension and added tiny black faceted gems to each corner.
 

 Also starting tomorrow is a 3 day extravaganza into the macabre!
I'm taking part in the Smeared and Smudged Bloody Valentine blog hop from Feb 11 until Feb 13.
My Beating Hearts ATC is actually going to be part of the cover of the 3 page Bloody Valentine book I'm making so check back tomorrow to see page one and then do the creepy blog hop if you dare ;0)

I've also got a call out for Romantic Players for my DominoART Blog's Romancing the DominoART event which starts Feb 14th!  Check out all the details here and show us your romantic side DominoART style and join the fun!


 THE SHARPIE DOMINO QUEEN
I design for Blockheads Paper Arts * Third Coast Rubber Stamps * Lost Coast Designs * About Art Accents

Thursday, February 7, 2013

"Sea of Ink" Painting Backgrounds with Perfect Pearls

Hello Friends!

For February the Blockheads Paper Arts design team are featuring Ranger's Perfect Pearls and today I'm sharing two of my favourite PP techniques, painting with them and applying the dry powders to a stamped image.


In the photo above I created a seascape background for my card.  I used the Perfect Pearls Patina set as well as white Perfect Pearl from the Metallics set on double-sided cardstock that is black on one side and white on the other.  You can see that the black cardstock produces a darker effect and the colours are brighter and much lighter when painted on white cardstock.  You can also use Pearl Ex Powders too if you only have those!  To paint with Perfect Pearls just use a few drops of water, add the dry powder and mix together.  You can play with how thick you want the consistency by either adding less or more of either the water or the powder.  A very small amount goes a long way.


I decided to go with the white side of the cardstock to make my step card so that I would have a nice contrast with the stamped panel.  The fish tile (Seascape - Fishes set) and the sentiment (Verses Full Sheet set) were both stamped on black cardstock with Perfect Pearls Medium, you can also use a Versamark Watermark ink pad to achieve the same result.  I dusted Perfect Pearl and Blue Patina onto the main image and Green Patina onto the frame border with a small soft bristle brush then dusted off the excess powder with a larger brush.  The sentiment was stamped in the same way but this time I just dusted on Perfect Pearl.  Spritz both with a fine mist of water to make the powders permanent.  I like to use Ranger's Mini Mister bottle for this application.


I used my Perfect Layers #2 tool to cut a 1/16" black border around the fish tile and eyeballed the cutting out of the sentiment.  I then tattered up the edges on both with Tim's Paper Distresser tool by Tonic and applied Brushed Pewter Metallic Distress Stain to highlight the edges.  Add dimension to the fish tile by applying Inkssentials Matte Accents to just the fish and seascape areas.  I then added 3 water droplets on all 4 corners too and put it aside to dry.


Die cut the card with a Center Step Card die by The Stamp Doctor.   Stamp the floral flourish image from Blockheads' Grunge It Up set on the two narrow side panels with Jet Black StazOn ink.  I like that stamp coz it looks like seaweed!  Wrap the lower panel with a length of sheer white ribbon and tie a bow.  Sew a silver fish charm to the bow with white cotton.   Secure the ribbon in place with a bit of double sided tape and adhere the sentiment panel with double sided tape as well.  Adhere the fish tile to the center of the step card with black pop dots or transparent Kool Tak tape.


Thanks for visiting with me today and if you want to see more Perfect Pearls techniques then pop on over to the Blockheads' Blog to see what my fellow team mates are creating!  Don't forget to pop by my Perfect Paper Crafting ambassador page too for more info on their fabulous tools and use my special coupon code Leigh5% to get 5% off your entire order!

Challenges entered:
 Anything Challenge #85 - Monochrome
Crafty Ribbons #38 - Anything Goes with Ribbon
Happy Stamping!
 THE SHARPIE DOMINO QUEEN
I design for Blockheads Paper Arts * Third Coast Rubber Stamps * Lost Coast Designs * About Art Accents

Steamy Alice in Wonderland Valentine - Gate-fold card

Hello Friends!
 It's my turn to post over on the Third Coast Creative Coterie blog and today I'm sharing a Valentine gate-fold card with a Steampunk Alice in Wonderland theme.

update: this one received an Honourable Mention at


I always have so much fun when I can combine Steampunk with Alice in Wonderland and Third Coast Rubber Stamps' Steamy Alice KG-060-Q is definitely one of my favourite stamp images.  I also used Third Coast's Be My Valentine WS-102-C, Heart Rose CK-152-I and the seriously cool winged Steampunk heart rubber stamp from Smeared Ink.


Stamp the AIW image on Neenah Solar White cardstock with Tuxedo Black Momento Ink and die cut out with a Spellbinders Heart die.  I used the following Copic markers to colour the image:  RV10, 13, 17, R39, 46, Y11, 15, 17, E0000, 00, 02, 18, 19, 41, B000, 100 Black and 0 Colourless Blender plus Derwent Pastels Ivory Black and Geranium Lake and a Dove Blender Pen on the background.  Stamp the Heart Rose image with Blazing Red StazOn ink all over a jumbo Ace of Hearts playing card and a funky shaped Four of Hearts...did you notice that equals 14? ;0)


 I made the short gatefold card out of dark red cardstock embossed with Craftwell's 8.5 x 11" Regency embossing folder which I ran through my eBosser machine (available at Crafter's Companion).  I'm really loving this large format embossing folder :0)  The fold lines were scored on a TopScore Multiboard.  Stamp the Valentine sentiment on a scrap piece of Neenah Solar White cardstock with Tuxedo Black Momento Ink, cut out then distress the edges with Tim's Paper Distresser tool.  Adhere the playing cards and the sentiment to the embossed cardstock and cut out.  Distress all the edges with Tim's Paper Distresser tool then apply Black Soot Distress Ink with a foam ink applicator tool to all the edges and the embossed design.


Punch four 1/8" holes into the front flaps and attach Card Suite eyelets with a Crop-A-Dile multi tool.  Stamp the Winged Heart image twice on Neenah Solar White cardstock with Tuxedo Black Momento Ink and fussy cut out.  Colour with Copic markers then apply Inkssentials Matte Accents to just the hearts and add two mini watch cogs while its still wet.  Also add the Matte Accents to the single heart beneath each Card Suite number.  Adhere the playing cards and the sentiment to the card base with a touch of glue and tiny staples.  Adhere the stamped die cut inside the card with dimensional silicone glue instead of pop dots and adhere the Winged Hearts to the front with glue.  Complete the card by lacing up the front flaps with narrow red ribbon.  The ribbon can either be tied in a bow through a single eyelet once the card is open or just removed completely.


Thanks for stopping by and have a fabulous day...I know I will coz today is my birthday and I get to stamp all day :0)

Happy Stamping!
 THE SHARPIE DOMINO QUEEN
I design for Blockheads Paper Arts * Third Coast Rubber Stamps * Lost Coast Designs * About Art Accents